Featured

Components Of Android

Application components are the essential building blocks of an Android application. These components are loosely coupled by the application manifest file AndroidManifest.xml that describes each component of the application and how they interact.

There are following four main components that can be used within an Android application −

Sr.No Components & Description
1 Activities

They dictate the UI and handle the user interaction to the smart phone screen.

2 Services

They handle background processing associated with an application.

3 Broadcast Receivers

They handle communication between Android OS and applications.

4 Content Providers

They handle data and database management issues.

Activities

An activity represents a single screen with a user interface,in-short Activity performs actions on the screen. For example, an email application might have one activity that shows a list of new emails, another activity to compose an email, and another activity for reading emails. If an application has more than one activity, then one of them should be marked as the activity that is presented when the application is launched.

An activity is implemented as a subclass of Activity class as follows −

public class MainActivity extends Activity {
}

Services

A service is a component that runs in the background to perform long-running operations. For example, a service might play music in the background while the user is in a different application, or it might fetch data over the network without blocking user interaction with an activity.

A service is implemented as a subclass of Service class as follows −

public class MyService extends Service {
}

Broadcast Receivers

Broadcast Receivers simply respond to broadcast messages from other applications or from the system. For example, applications can also initiate broadcasts to let other applications know that some data has been downloaded to the device and is available for them to use, so this is broadcast receiver who will intercept this communication and will initiate appropriate action.

A broadcast receiver is implemented as a subclass of BroadcastReceiver class and each message is broadcaster as an Intent object.

public class MyReceiver  extends  BroadcastReceiver {
   public void onReceive(context,intent){}
}

Content Providers

A content provider component supplies data from one application to others on request. Such requests are handled by the methods of the ContentResolver class. The data may be stored in the file system, the database or somewhere else entirely.

A content provider is implemented as a subclass of ContentProvider class and must implement a standard set of APIs that enable other applications to perform transactions.

public class MyContentProvider extends  ContentProvider {
   public void onCreate(){}
}

We will go through these tags in detail while covering application components in individual chapters.

Additional Components

There are additional components which will be used in the construction of above mentioned entities, their logic, and wiring between them. These components are −

S.No Components & Description
1 Fragments

Represents a portion of user interface in an Activity.

2 Views

UI elements that are drawn on-screen including buttons, lists forms etc.

3 Layouts

View hierarchies that control screen format and appearance of the views.

4 Intents

Messages wiring components together.

5 Resources

External elements, such as strings, constants and drawable pictures.

6 Manifest

Configuration file for the application.

Identifying Views in Android

In Android we use various components on Activity(screen) of our application. The basic components include TextView, Button, EditText etc. To use components and its properties two basic steps we need to follow
1. Declaration of Componenet in XML.
2. Identify the component in java.

1.Declaration of Component in XML
In XML we need to declare every component in XML tag with some mandatory attributes like id, width and height.Image_1

In above code we have declare the TextView Component with its mandatory attributes like id,width, height, text.
Note : Providing id is important.

2. Identify the component in Java
In java every component is equal to its class. To interact with every component we are using its class objects.Image_2 
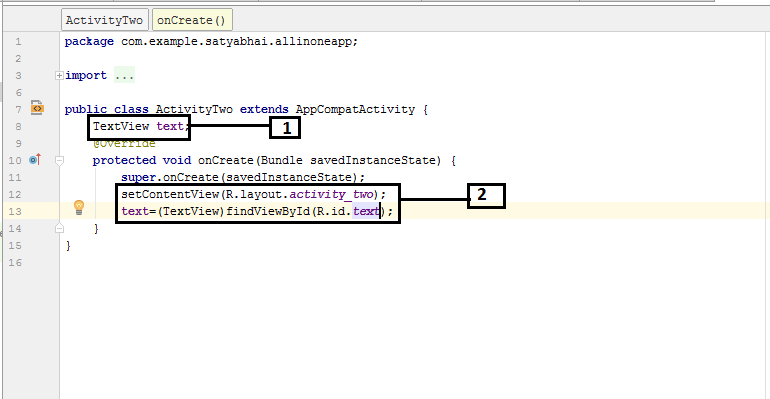
1.     We have created the class instance.

2.     We know that for every resource in resource folder, it creates static integer field in R.java with the help of which we can access resource into activity. R is termed as resource. It is abstraction between Java and different resources in Resource folder(mediator between java and resource). To achieve this a method called as findViewById is used.
Syntax :
TextView text=(TextView)findViewById(R.id.text);
By this method we get parent class class object as a return type so we downcast it.

Note: setContentView(R.layout.activity_two) :This is used to set User-Interface in XML to Java.

Activity Lifecycle in Android

Activity Lifecycle:  Activity is one of the building blocks of Android OS. In simple words. Activity is a screen that user interact with. For example, an email app might have one activity that show a list of  new emails, another activity to compose an email, and another activity for composing emails. Every Activity in android has lifecycle like created, started, resumed, paused, stopped or destroyed. These different states are known as Activity Lifecycle. In other words we can say Activity is a class pre-written in Java Programming.

An activity facilitates following key interactions between system and app:

  • Keeping track of what the user currently caresabout to ensure that the system keeps running the process that is hosting the activity.
  • Knowing that previous used processess contain things that the user may return to. And thus more highly prioritize keeping those processes around.
  • Helping the app handle having its process killed so the user can return to activities with their previous state restored.
  • Providing the way for the apps to implement user flows between each other, and for the system to coordinate these flows.


Imp: We implement the Activity as the subclass of Activity class


Below is Activity Lifecycle :

onCreate() – Called when the activity is first created

onStart() – Called just after it’s creation or by restart method after onStop(). Here Activity start

becoming visible to user

onResume() – Called when Activity is visible to user and user can interact with it

onPause() – Called when Activity content is not visible because user resume previous activity

onStop() – Called when activity is not visible to user because some other activity takes place of it

onRestart() – Called when user comes on screen or resume the activity which was stopped

onDestroy() – Called when Activity is not in background


LIST OF ACTIVITY LIFECYCLE METHODS OR STATES:

Activity Created: onCreate(Bundle savedInstanceState):

onCreate() method is called when activity gets memory in the OS. To use create state we need to override onCreate(Bundle savedInstanceState) method. Now there will be question in mind what is Bundle here, so Bundle is a data repository object that can store any kind of primitive data and this object will be null until some data isn’t saved in that. When an Activity first call or launched then onCreate(Bundle savedInstanceState) method is responsible to create the activity. When ever orientation(i.e. from horizontal to vertical or vertical to horizontal) of activity gets changed or when an Activity gets forcefully terminated by any Operating System then savedInstanceState i.e. object of Bundle Class will save the state of an Activity. It is best place to put initialization code.

Activity Started: onStart(): 

onStart() method is called just after it’s creation. In other case Activity can also be started by calling restart method i.e after activity stop. So this means onStart() gets called by Android OS when user switch between applications. For example, if a user was using Application A and then a notification comes and user clicked on notification and moved to Application B, in this case Application A will be paused. And again if a user again click on app icon of Application A then Application A which was stopped will again gets started.

Activity Resumed:.onResume():

Activity resumed is that situation when it is actually visible to user means the data displayed in the activity is visible to user. In lifecycle it always gets called after activity start and in most use case after activity paused (onPause).

Activity Paused: onPause():

Activity is called paused when it’s content is not visible to user, in most case onPause() method called by Android OS when user press Home button (Center Button on Device) to make hide. Activity also gets paused before stop called in case user press the back navigation button. The activity will go in paused state for these reasons also if a notification or some other dialog is overlaying any part (top or bottom) of the activity (screen). Similarly, if the other screen or dialog is transparent then user can see the screen but cannot interact with it. For example, if a call or notification comes in, the user will get the opportunity to take the call or ignore it.


Activity Stopped: onStop():

Activity is called stopped when it’s not visible to user. Any activity gets stopped in case some other activity takes place of it. For example, if a user was on screen 1 and click on some button and moves to screen 2. In this case Activity displaying content for screen 1 will be stopped. Every activity gets stopped before destroy in case of when user press back navigation button. So Activity will be in stopped state when hidden or replaced by other activities that have been launched or switched by user. In this case application will not present anything useful to the user directly as it’s going to stop.

Activity Restarted: onRestart():

Activity is called in restart state after stop state. So activity’s onRestart() function gets called when user comes on screen or resume the activity which was stopped. In other words, when Operating System starts the activity for the first time onRestart() never gets called. It gets called only in case when activity is resumes after stopped state.

Activity Destroyed: onDestroy():

Any activity is known as in destroyed state when it’s not in background. There can different cases at what time activity get destroyed. First is if user pressed the back navigation button then activity will be destroyed after completing the lifecycle of pause and stop. In case if user press the home button and app moves to background. User is not using it no more and it’s being shown in recent apps list. So in this case if system required resources need to use somewhere else then OS can destroy the Activity. After the Activity is destroyed if user again click the app icon, in this case activity will be recreated and follow the same lifecycle again. Another use case is with Splash Screens if there is call to finish() method from onCreate() of an activity then OS can directly call onDestroy() with calling onPause() and onStop().

Project Structre in Android

structre


Android Manifest.

The AndroidManifest.xml is a required file for every Android application. It is located in the root folder of the application, and describes global values for your package, including the application components (activities, services, etc) that the package exposes to the ‘outer world’, what kind of data each of our Activities and co. can handle, and how they can be launched.

An important thing to mention of this file are its so called IntentFilters. These filters describe where and when that activity can be started. When an activity (or the operating system) wants to perform an action such as open a Web page or open a contact picker screen, it creates an Intent object. This Intent-object can hold several information describing what you want to do, what data is needed to accomplish it and other bits of information. Android compares the information in an Intent object with the intent filter exposed by every application and finds the activity most appropriate to handle the data or action specified by the caller. If there it more than one application capable of handling that Intent, the user gets asked, which app he would prefer handling it.

Besides declaring your application’s Activities, Content Providers, Services, and Intent Receivers, you can also specify permissions in AndroidManifest.xml.


Java

This contains the .java source files for your project. By default, it includes an MainActivity.java source file having an Activity class that runs when your app is launched using the app.


Drawable

This is the directory for drawable objects that are designed for high-Density screen. We can put images in this folder. This images can be used in various Activities in our app.


Layout (activity_main.xml)

Layout is directory for files that define your app’s user Interface. . Defining the GUI structure in XML is highly preferable

Values

This is a directory for other various XML files that contain a collection of resources such as strings and colour definations.

Get started with Android Studio

Install and Set up your First Project


Android Studio is Google’s officially supported IDE for developing Android apps. Based on IntelliJ IDEA, Android Studio is freely available under Apache License 2.0. The most recent stable version, 2.1.1, includes the following features:

  • A unified environment where you can develop for all Android devices.
  • Support for building Android TV apps and Android Wear apps.
  • Template-based wizards to create common Android designs and components.
  • A rich layout editor that lets users drag-and-drop user interface components, and that offers an option to preview layouts on multiple screen configurations.
  • Android-specific refactoring and quick fixes.
  • Gradle-based build support.
  • Lint tools to catch performance, usability, version compatibility, and other problems.
  • ProGuard integration and app-signing capabilities.
  • A fast and feature-rich emulator.
  • Instant Runto push changes to your running app without building a new APK (Application PacKage Zip file).
  • Built-in support for Google Cloud Platform, enabling integration with Google Cloud Messaging and App Engine.
  • C++ and NDK support.
  • Plugin architecture for extending Android Studio via plugins.


Download Android Studio

Google provides Android Studio for the Windows, Mac OS X, and Linux platforms. You can download this software from the Android Studio homepage. (You’ll also find the traditional SDKs, with Android Studio’s command-line tools, available from the Downloads page.) Before downloading Android Studio, make sure your platform meets one of the following requirements:

Windows OS

  • Microsoft Windows 7/8/10 (32-bit or 64-bit)
  • 2 GB RAM minimum, 8 GB RAM recommended
  • 2 GB of available disk space minimum, 4 GB Recommended (500 MB for IDE + 1.5 GB for Android SDK and emulator system image)
  • 1280 x 800 minimum screen resolution
  • JDK 8
  • For accelerated emulator: 64-bit operating system and Intel processor with support for Intel VT-x, Intel EM64T (Intel 64), and Execute Disable (XD) Bit functionality


Installing Android Studio on 64-bit Windows 8.1

I launched android-studio-bundle-143.2821654-windows.exe to start the installation process. The installer responded by presenting the Android Studio Setup dialog box shown in Figure 1.

Figure 1. Set up Android Studio

pic_1

Clicking Next took me to the following dialog box, which gives you the option to decline installing the Android SDK (included with the installer) and an Android Virtual Device (AVD).

pic_2

Figure 2. Do you want to install the Android SDK and AVD?

I chose to keep the default settings. After clicking Next, you’ll be taken to the license agreement dialog box. Accept the license to continue the installation.

pic_3

Figure 3. Accept the license agreement to continue installation

The next dialog box invites you to change the installation locations for Android Studio and the Android SDK.

pic_4

Figure 4. Set the Android Studio and Android SDK installation locations

Change the location or accept the default locations and click Next.

The installer defaults to creating a shortcut for launching this program, or you can choose to decline. I recommend that you create the shortcut, then click the Install button to begin installation.

pic_5

Figure 5. Create a new shortcut for Android Studio

The resulting dialog box shows the progress of installing Android Studio and the Android SDK. Clicking the Show Details button will let you view detailed information about the installation progress. The dialog box will inform you when installation has finished. When you click Next, you should see the following:

pic_6

Figure 6. Leave the Start Android Studio check box checked to run this software

To complete your installation, leave the Start Android Studio box checked and click Finish. 

Running Android Studio

Android Studio presents a splash screen when it starts running:

pic_7

Figure 7. Android Studio’s start screen

On your first run, you’ll be asked to respond to several configuration-oriented dialog boxes. The first dialog box focuses on importing settings from any previously installed version of Android Studio.

pic_8

Figure 8. Import settings

If you’re like me, and don’t have a previously installed version, you can just keep the default setting and click OK. Android Studio will respond with a slightly enhanced version of the splash screen, followed by the Android Studio Setup Wizard dialog box:

pic_9

Figure 9. Validate your Android SDK and development environment setup


When you click Next, the setup wizard invites you to select an installation type for your SDK components. For now I recommend you keep the default standard setting.

pic_10

Figure 10. Choose an installation type

Click Next and verify your settings, then click Finish to continue.

pic_11

Figure 11. Review settings

The wizard will download and unzip various components. Click Show Details if you want to see more information about the archives being downloaded and their contents.

pic_12

Figure 12. The wizard downloads and unzips Android Studio components

If your computer isn’t Intel based, you might get an unpleasant surprise after the components have completely downloaded and unzipped:

pic_13

Figure 13. Intel-based hardware acceleration is unavailable

Your options are to either put up with the slow emulator or use an Android device to speed up development. I’ll discuss the latter option later in the tutorial.

Finally, click Finish to complete the wizard. You should see the Welcome to Android Studio dialog box:

pic_14

Figure 14. Welcome to Android Studio

You’ll use this dialog to start up a new Android Studio project, work with an existing project, and more. You can access it anytime by double-clicking the Android Studio shortcut on your desktop.